

Good morning, y'all...
You can find Day 1, HERE.
Today, we're going to create
the bottom half of your blog header.
Hopefully, you've created your top half this weekend, so you won't have so much to do at once.
Let's get started!
Once again, we're going to go into PicMonkey.
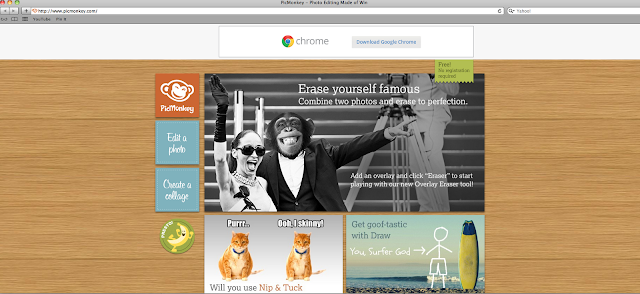
Instead of clicking "Edit a Photo",
we're going to choose "Create a Collage".
we're going to choose "Create a Collage".
That will take you to this page:
Next, you're going to upload
as many pictures as you want in your collage.
as many pictures as you want in your collage.
Click "Upload Photos".
I'm going to upload 5.
Tip: You can upload multiple photos at once by holding down your command key while you click on the photos you want from your photo file, instead of loading them one at a time.
As you can see below, I've uploaded the five photos
that I want to include in my header.
that I want to include in my header.
Next, you're going to click on "Choose Collage Layout". That's the 2nd icon on the left side of the page.
Then click on the "Ducks in a Row" icon.
It will give you the option of 2, 3, 4, or 5 pictures.
Obviously, I'm choosing five.
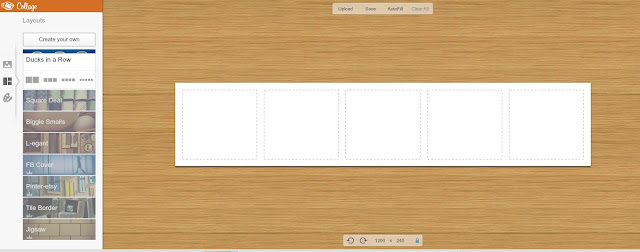
Click on the "Images" icon. It's the first icon on the left hand side.
Then click and drag each image onto the box you want to place it in.
Tip: You can center each picture by clicking and holding the button down on your mouse over it. The picture will either move up and down or back and forth, but not both. It's kind of tempermental that way. You just have to kind of deal with whatever it lets you do.
Okay, now you've got your pictures loaded into the collage.
Next you're going to click on 3rd icon - the artists palette. This is going to allow you to adjust the color of the background and the space between each picture in your collage. You can even round the corners of your pictures.
On mine, I just made the spaces narrower
and left the background white.
and left the background white.
Play around with it.
Figure out what speaks to you
and what shows your own personal style.
and what shows your own personal style.
Now, save your picture to your picture file on your computer.
Tip: It will help later if you save both your top and bottom half
into the same subfile in your picture file.
Tip: It will help later if you save both your top and bottom half
into the same subfile in your picture file.
You're done with your bottom half of your header.
YAY!
Now, here is where it gets tricky.
Do you have Picasa on your computer?
If not, you're going to need to download it.
You can download it for FREE, HERE.
Follow the directions to download the software to your computer.
Once you've done that or if you already have it, open your Picasa file.
Picasa will automatically download
every single photo file on your computer.
every single photo file on your computer.
As a photo editing software, I don't personally like it. That being said, it's a great tool to do what I like to call "marrying" two or more pictures into a single photo. If PicMonkey lets you do that, I haven't figured it out yet.
So, go ahead and open Picasa.
It'll look like this:
Yes, I really do have 22,026 pictures, 61 folders, and 35 collages.
I like pictures.
;)
Navigating Picasa can be difficult (understatement of the year) - especially trying to find the pictures you want. I hate it, however, ya gotta do it. Just keep looking and you'll find them.
You're looking for the pictures of the
top of your header and the bottom of your header.
top of your header and the bottom of your header.
When you find them (and hopefully you saved them in the same folder), you're going to click the "Collage" icon. This is the orange icon next to the green arrow at the top of your picasa file. It's right underneath the name of your file. I put a little gray circle on it, in the picture above.
The next page will be filled with all the pictures that are in the file.
As you can see, I have all my blog sign pictures in mine. This is why it's important to have both of your pictures in a subfile in your main picture file on your computer.
As you can see, I have all my blog sign pictures in mine. This is why it's important to have both of your pictures in a subfile in your main picture file on your computer.
No worries if you have a bunch of pictures in there.
We'll get rid of them.
Click "Select All" at the top of the page.
It'll put a red box around all the pictures.
It'll put a red box around all the pictures.
Click on the two photos you need for your header and then click "Remove"at the top of the page.
You should have only the two top and bottom halves of your header left on your collage template.
Click on each picture and a little gray ring will show up. You can rotate and enlarge it by keeping your mouse button depressed and moving your mouse.
It's touchy.
Play around a bit and get used to it.
Your goal is to rotate both images vertically and enlarge them
to fill up the left hand side of the page, like this:
Does that make sense?
Okay, as you can see, they still look like two separate pictures with shadows around them.
We're going to fix that.
Click the "Settings" tab on the Picasa Collage Control Panel. Then uncheck "Draw Shadows".
Your collage should look like this:
See?
No shadows and it looks like once seamless picture.
Yay!
You're done.
Almost.
;)
Next, you're going to click on "Create Collage".
After you click "Create Collage", it will create the collage
and then a page like this will come up.
Your collage is complete and you can use Picasa's photo editing software to make your pictures all pretty.
Yeah.
Don't.
Do that in PicMonkey.
You're still not quite done yet.
Next you're going to click on the "Export" icon.
It's located bottom center, the icon to the right.
And this little screen will pop up:
I always change the name of the exported folder
because I have a lot of collages.
:)
Click "Export".
It will then save it to a folder on your computer.
Okey Dokey...
Since this tutorial is super long,
we're going to call it quits today at this point.
Tomorrow, I'm going to show you how to do the final editing and how to get that picture from your computer onto your header.
Tomorrow, you will have a new header for your blog!
YAY!
Your homework for tonight is to follow the steps above to create the bottom half of your header and create your header collage in Picasa.
See you back here tomorrow!
Dream Big,


Hello sir, I got you by Google search.
ReplyDeleteYour posting I think not new because there are a lot of people have already post it or read it, but its okay. Please note this , in your post there are few words that you not edit with carefully after you used Google translate for translate it from your mother language into English.Welcome to Rugstar.com.au, Australia's favorite online rug buying groceries in Australia: we get direct deals from the producer to you! We sell an implausible range of Australian favorite floor rugs, floor rug, by way of shopping on-line you'll keep on shaggy, modern, wool, traditional and lots of different rug designs.
Oh Thank You Very Much For Write That Fantastic Article.
I truly enjoyed reading your post. we will bookmark your blog for future refernece. I want to encourage one to continue your Great post. how to install actions in photoshop
ReplyDeleteI am always searching online for articles that can help me. There is obviously a lot to know about this. I think you made some good points in Features also. Keep working, great job! free lightroom 5 landscape presets
ReplyDeleteI liked the post. The truth is a lot of information. But if the network and its fully read it cool. I now use this program https://macphun.com/creativekit . It allows me to do with low-quality content that is impossible. With it is possible to add and remove different types of effects and defects.
ReplyDelete