

 Hey, y'all!
Guess what time it is?
It's birthday party planning time!
The diva is turning 8!
I only have 40 days until the party...
But I have been asked about it for the last 2 months.
Eva knows her procrastinating mother well.
LOL!
So, for the sake of my sanity, I've commenced the planning process.
Which means getting sucked into Pinterest and pinning anything and everything that looks remotely cool... and cheap and easy to make.
{Sorry if you follow me
and you're being deluged with party ideas!}
;)
My goal: Complete 2 projects a week between now and December 1 directly related to the completion of the party.
Today, I thought I'd share with you a cheap and {somewhat} easy way to make custom party invitations.
The theme?
Yes, that theme has been done a million times before,
so nothing new and edgy here.
Honestly, I was drawn to it because it seems liked the cheapest and easiest route to go -
and the decorating possibilities are endless.
Let's face it...
Custom printed birthday invitations are pretty pricey,
so how can you get the look without the cost?
DIY, of course!
:)
I created two different invitations with
iMac Pages and a little help from Picmonkey.
Here are the two different styles I played around with on Friday:
Blue and Pink...
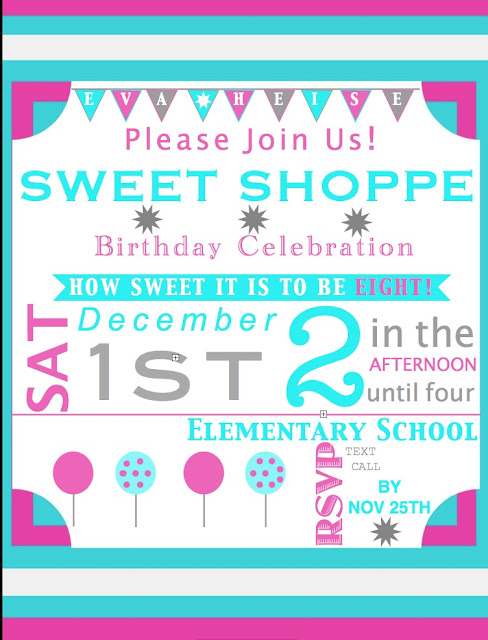
Pink and Green...
{Obviously I redacted the name of the school and my phone numbers, but you get the jist of it, I'm sure.)
Yes, we're going to have her party at our school.
$25.00 for the day,
so there's plenty of time for set up, the party,
and clean up in our cafeteria.
And lots of room to play games
and set up a craft station!
And better yet, the house doesn't get wrecked by 12 little girls.
:)
The one I settled on was the green and pink one.
I was afraid the blue and green would look too much like a baby shower.
Keep in mind that the printer will print it lighter
than it looks on your screen.
The process is pretty simple.
Supplies:
Computer
Photo Editing Software (like Picmonkey)
Windows/iMac Pages
Card Stock
Cloth/Burlap
Ribbon
Beads
X-Acto Knife
Scissors
Needle with large threading hole
Glue Gun
How To Do It:
1. Create the background/frame in Picmonkey.
Save the image you create to your computer.
Save the image you create to your computer.
2. Go into iPages and add the image using Media.
3. Add your text and shapes.
4. Save and Print on the Cardstock.
Of course it took me a couple of hours to figure out the layout.
Browse online for your inspiration.
Here was mine:
| Hostess With the Mostest |
So cute!
And the cool thing about adding the image onto your document is: You can decide on the size.
You can do a full size page or smaller 4x6 invites.
Completely up to you.
I chose 4x6 invites,
so they would fit inside the social envelopes
I picked up at Wally World.
After you have created your invitation,
you get to the fun part!
Embellishing your invitation
and truly making it custom!
5. Cut out your invitations.
6. Cut your cloth. {I ripped mine.}
7. Using your X-Acto Knife,
cut two slits into the top of your invitation.
8. Using your needle, thread your ribbon through the slits...
and tie your bow.
9. Using the glue gun, glue a bead to the ribbon
to embellish it.
10. Then place two dots of hot glue on the top edges of your invitations to attach it to your cloth.
And that's it.
You're done!
A way cute custom invitation for your special occasion!
And the best part about this was,
I only bought the envelopes and card stock.
Total Spent: $10.00
BONUS!
A fraction of the cost of custom invites.
And Eva can't wait to hand them out!
Dream Big,

you are amazing..our twins turn 8 and we are just having grandma and grandpa over..LOL!!
ReplyDeleteYou have fun with that. We used to do big parties when they were little and I think it burned us out! Those invitations are adorable! You are awesome!
very cool idea..makes me wish my kids were little again! - NOT!!! lol
ReplyDeleteCheryl @ The Creative Me and My McG
What a fun mom you are. For the last couple of years, we have hit the road for Joey's birthday. Last year, after he played his football playoff game at 8:00 p.m. here, we drove through the night to San Francisco to watch the Ducks play Stanford for his birthday. Anything I can do to avoid a big party at home. LOL. I'm just not as cool as you are. ;)
ReplyDeleteI have been known to crash kids parties dressed as a clown.
ReplyDeleteBliss
If my children ever find out there are orginized Mom's like you,I'm doomed! My middle child will be turning 8 in 9 days and I still haven't made a single arrangement for his party!
ReplyDeletePiper
Do you do Christmas cards?
ReplyDeleteThat is beautiful invitation! I like the colors, and good choice of font. Combination of ribbon and pellet is good idea!
ReplyDelete